Pages

Saturday, August 20, 2011

Steamed Egg Recipe (clap for joy)


So you know how when you were younger, your taste buds used to be really, really simple. There was once upon a time, when our knowledge of food and taste was so unadulterated by all the complex/sophisticated techniques and ingredients we have come to experience over the years.

You either like a food or you don't, that was it. It wasn't about how it looked, or how expensive it was, but simply how it made you happy/excited from the very first bite, for whatever reason it may be. You would eat delicious food wide-eyed, and smiling.

Mum likes to remind me that when I was younger, I used to be such a picky eater. But then there are those times, when I would walk into the kitchen, and immediately clap for joy at the sight of what was prepared before me, and she would laugh. My excitement and appreciation was uncontrollable. I can tell you now, that till this day, this is still the case =)

There's so many home-cooked food that I can remember off the top of my head that would make me feel this way. Dinners with deep fried prawns, fried nam yu pork, plum sauce duck, ikan masin eggplants, the list goes on (and on...). There's so many of these kind of recipes of my childhood that I plan to revisit and recreate on this blog, so do stay tuned.

This Steamed Egg dish was definitely one of them. Since I was a kid, one of my favourite things to eat was Eggs. Eggs, eggs, eggs... Boy, did I love eggs... I could eat a big plate of rice with this every time and would always secretly wish we could have this for dinner every night. No kidding.

The silkiness of the egg, countered by the saltiness of the duck yolk (placed right at the centre as the "treasure" of the dish), on a bed of tasty mince which had lots of sauce or gravy to go with your rice. Simply, divine. I'm so glad that I can make this dish for myself now.

And what's best is that it's not only delicious, but it seriously takes close to no time to make.
3min prep time + 10min cooking time, it's done before your rice is even ready. Awesome.

On a more technical note, I've always found the perfect ratio of egg to water that will give you a smooth and delicious consistency is 50ml of water per egg. So do feel free to use this if you use a deeper dish or would like to increase the volume of your egg. Also, 10min total steaming time under high heat works best for me. If you find that your eggs still haven't set, steam longer but not too long or they will turn out too stiff and "egg-y". You could also omit the "poking step" by steaming it longer under lower heat but I'm lazy and this is quicker.

Now tell me, what are some of the food that you now, or used to, like eating that would make YOU clap for joy? Anything from your childhood or of late?

Would love to hear the stories behind all the food that still brings a heartfelt joy to you or your family. Hope you're all having a smashing start to the week!


Blessings,
Winston =)


_______________________________________


Steamed Egg Recipe

Ingredients:

Ground meat:
250g minced pork
2 tbsp sesame oil
3 tbsp Shao Xing wine
2 tsp oyster sauce
1 tsp light soy sauce
4 tsp chilli oil (optional, if you like a bit of kick like me)

Egg custard:
3 eggs (your usual 60 - 70g ones)
150ml water or chicken stock
dash of white pepper

1 salted duck egg (optional)

Method:

1. Separate duck egg white and yolk. Combine all ground meat ingredients, including duck egg white (if using). In a separate bowl, whisk egg, water and pepper. Set aside.
2. Place ground meat at the bottom of a 22cm deep dish (approximate). Pour egg custard on top. Place duck egg yolk in middle.


3. Steam on high heat for 7 minutes. Open cover and use spoon to poke all around the egg mixture (to release built up steam in egg). Garnish with spring onions if you like and continue to steam for another 3 minutes (which makes 10 minutes in total). Serves 4 as a meal with rice and other dishes.


Sunday, August 14, 2011

The Boathouse Restaurant, Maribyrnong


Personally, I don't like the word "reviews". It always gives me the impression of someone who is so far superior in knowledge of flavour/taste to give a precise and detailed critique on food. I am no where near that. And I know that most of the time it's not the case, but it still gives me the impression. (No offence intended to anyone).

However, dining out each time is such an experience to me. There's so much I wanna say because Food excites me so. So I guess this is just something I'll have to get used to, eventually.

And I always tell my friends I'm not a pro. I can't tell you how a dish SHOULD taste, but I can only happily share what I personally like (and don't like) about it.

And another thing that makes me hesitant about this kinda stuff is because I don't like to be held accountable to people. My opinions are really based on my dining experience at that specific point in time. We all know that not all restaurants are always consistent.

Heck, too many times have I gone back to a restaurant only to find that it's not the same anymore. Hence, good for me not necessarily good for me (again) and also you. You just have to believe how I felt at the time and try it for yourself.

Anyway, back to the Food. I've got this friend that I consider my foodie buddy. He used to be my housemate and one thing we loved doing was to think of which restaurants we'd try next. At the end of it, we always have a list that's too long for our own good and get ourselves really hungry. Aih...

And The Boathouse Restaurant in Maribyrnong by Masterchef Judge, Gary Mehigan, has always been one of them. We had a couple of errands to run in the West so we couldn't pass up this chance to try out this place. A perfect way to spend a pleasant Saturday morning with friends.


Ambience was very warm and inviting. I loved that there were lots of windows and natural light. Just feels more open and relaxed.


Soy Piccolo Latte

Everyone knows that Soy Pics are always my coffee of choice. However, I was quite disappointed by mine here. As if the glass wasn't small enough already, it was the first time I had been served a coffee that's not filled to the brim, which made it slightly bitter. Also, the froth was not smooth. The bubbles were too big and made it very thick to drink.


BUT, I was still happy because I got to spend that wonderful morning somewhere new with my dear friends (who always let me pick and take a picture on their food, hehe...) On to the food...


Ann's "The Lot" Breakfast

Sausage was good.


Kel's Roasted Field Mushrooms, Spinach, Poached Egg and Hollandaise

Hollandaise was delicious.


Ian's Avocado Toast with Smoked Salmon, Wild Rocket and Feta


Hashbrowns

By golly were they perfectly cooked and delicious or what. Lots of microbubbles on this thing. Well done.


I had the "Breakfast Pizza" with crispy bacon, mushrooms and poached eggs

SO GOOD. The toppings were fairly straight-forward, but what made this pizza OUTSTANDING was the dough and how it was baked. It was my favourite kind of pizza to eat. The base was crispy, yet firm.


A lot of times I don't like woodfired pizzas because they tend to be stretched too thin that sauce started to seep through. Which makes them soggy and not crunchy. What's worse are woodfired pizzas that are so sloppy that toppings fall off when you hold them vertically. Thankfully, this was neither and the pizza was thick enough and baked till it was stiff and had a delicious crunch at the base. LOVED it.


Another thing I loved about the pizza was the little air pockets that you get at the crust. I LOVE THIS in pizzas! Just gives this extra texture and crunch from it which I always enjoy. Also, what's great about this was the slight char you find at certain parts of the crust. I love char, anywhere, anytime, so this was good for me.

Final thing that I noticed about the pizza was that it wasn't as sandy compared to other woodfired pizzas. In fact, you could feel a bit of oil when you touch the dough. Not sure how they did it but I'm sure it helped make the pizza extra crunchy when baked.


Overall, I really enjoyed the brekkie experience here. Although I'm aware that reviews here have not been the best. I'm just trying to be honest about my experience there, then, and this was based on brekkie only. They have a separate menu for lunch and dinner.

But to be very frank, I really wished they hadn't given me the two runny poached eggs (which had yolks that were surprisingly yellow, btw), because they made me feel really bloated by the end of it. Without it I'm sure I would have enjoyed myself a lot more.

Regardless, I had a great time and I can't wait to go on more food adventures with my amazing friends in Melbourne. Cause food can be good, but it's the company that makes a meal GREAT.


- Winston OUT! =)


The Boathouse on Urbanspoon

Thursday, August 11, 2011

EASY Basil Pesto Pasta Recipe

Hey everyone,

So most of my friends know this about me already, but at the end of the day, what I LOVE to eat MOST is simple, tasty, comfort food. Period.

Though I may love to savour finer foods from time to time, nothing gets me more going than food that's tugged a certain string in your heart and hence an appetite that you later cannot control. These kind of food comes from a different place and it could be a big, hearty plate of spag bol, or some Chinese pork dish so tasty that you'll quickly inhale it with a mountain of rice.

That kinda stuff, y'know? Nothing fancy but hits home.

And another thing I'm going to be doing on this blog is starting a new series called: Simple Meal Ideas.

This collection of recipes is personally dedicated to all of you, who, like me, can struggle with limited time/ideas/resource (cause I'm a student on a budget, too) to prepare a meal on a busy night of the week after a long day of work.


I have all the international students and busy working class people out there specifically in mind for this. The main objective is also to inspire people who have always been to scared/tired to cook anything with recipes SO SIMPLE that they know easy, healthy, delicious meals are really not as daunting as they'd think.

Also, hopefully to give more "experienced" cooks new ideas if they've already hit a bit of a "rut" in their daily diet. Cause I know that happens to me quite often, too.

I've already started by sharing my Creamy Butter Chicken and Milk Jelly Recipe, and today's recipe is going to be based on one that's been passed on to me by my sister quite some time ago.

It's one that I've made SO often for so many friends and family because it truly is one of the simplest, yet tastiest dishes you can prepare for yourself. It's basically mixing everything together. But the key is to season it with lots, and LOTS of cracked salt and pepper.

I've received so many positive feedbacks for this dish over the years and I always feel bad because they don't realise how little effort actually went in and was required to prepare this dish. However, I have a strong feeling it's partly because it's a good change from your usual Tomato/Cream based pasta. Seriously.

And please note that I made this dish for a friend's 21st last weekend and there were 30 people and hence the extremely, extremely humongous portion size. And the only reason I managed was because of how simple this recipe really was. Otherwise, I'd be stuffed.


Also, what I LOVE most about this recipe is that you can make it with ANYTHING you want and it uses lots of fresh ingredients from your local deli. However, I personally do prefer the sun-dried tomatoes from the jar simply cause they are fuller, chewier and sometimes sweeter compared to the ones from the deli.

As for the pesto, please feel free to make your own if you like. But as I've mentioned earlier, this recipe is designed to make it simple for people and store bought ones are not a bad option too.

But to be truly, truly frank with you, this recipe works best with cut up Ikea Meatballs ;p

Enjoy!


EASY Basil Pesto Pasta
(Serves 3 or 2 big eaters)

Ingredients:

250g pasta of choice
250g mushrooms of choice (sliced)
80g baby spinach
230g shaved ham (or Ikea Meatballs)
3 tbsp butter
100g basil pesto
100g sun-dried tomatoes

Salt and Pepper to taste


Method:

1. Boil pasta as per packet instructions until el dente. Drain, rinse with cold water and set aside. Heat up pan/wok and saute the mushrooms with butter until soft. Stir in pasta, pesto and mix well to combine.


2. Stir in all the ham, spinach, sun-dried tomatoes and mix well to combine. The bottom right picture is to show you how massive the portion was even for my huge ass wok.


3. Finally, crack lots and LOTS of salt and pepper. Even if you think you've done enough, you really haven't so keep cracking until your arms give out. Then, taste before giving it a final stir to combine. Now, enjoy! =)


P.s.
Don't know about you but I'm seriously lovin' the step-by-step photos! Definitely hope to be able to do it more in the future. Peace!

Monday, August 8, 2011

Carlton Community Cookbook Photoshoot

Hey guys,

So some time last semester, I decided to participate in a little passion project after being approached by my friend, Karen. Basically, Karen is the Founder and Senior Editor of Meld Magazine. An online magazine that serves to provide international students in Australia with relevant news in various categories and an opportunity to gain work experience in the media industry.

One of the projects they've undertaken this year was a community cookbook, with recipes contributed by people from various backgrounds that make up the entire Carlton community in Melbourne. It's a brilliant initiative with a fantastic vision to bring people together from various walks of Life, through FOOD.

Amazing.

So when asked by Karen if I wanted to contribute some recipes and also join the team as a photographer, I couldn't say no. It's something that I've always wanted to spend more time in doing on this blog, which is to cook, shoot and style photos of food more properly and beautifully. Unfortunately, being a full-time student at uni with a part-time job only makes it hard.

As for the recipes, I've decided to go simple and share my:
2) Creamy Butter Chicken (recipe below)

The whole experience was fun and exciting. And boy, do I have a new found appreciation and respect for Food Stylists now or what. It ain't easy. Cracking your head to think of what objects/ingredients to use as props, what goes well, what doesn't, everything! Mentally exhausting. Also, continuously repositioning your body just to get good angle and lighting. Phew!

Anyway, as tiring as it was, I had a blast and am so honoured for the opportunity to have a glimpse into the real world of Food Photography. Definitely an art I hope to improve on with time.

So the following are my final products/contributions to the Carlton Community Cookbook. Quite happy with the final outcome but as you can tell, there's always room for improvement =)

If you like, you can pick up a copy of it for only $15: here! Also, it ships anywhere. It's an amazing cookbook that's not just filled with simple and tasty ideas, but food from the Heart. Responses have been great so far and I'm sure you'll enjoy them too!

As for the future of this blog, I do plan to dedicate more time for updates and focus on sharing more tested and tried recipes from my kitchen. It's high time I picked up the slack on this blog, so watch this space!

Hope you're all doing well wherever you are.


Blessings,
Winston.


Heng Khuen Cheok's Cold Tofu


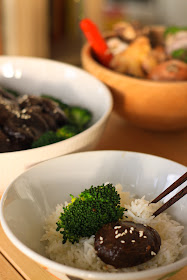
Ellie Khoo's Braised Mushrooms with Broccoli


Jor Ji Yeoh's Sesame Oil Chicken


Winston Chua's Milk Jelly (recipe: here)


Winston Chua's Creamy Butter Chicken


Creamy Butter Chicken Recipe
(An original recipe for the Carlton Community Cookbook)

This recipe is one of the first dishes I learned to cook on my own after I left home. Even after all these years, the wonderful aroma of the butter, curry leaves and chilli never fails to excite my senses. While I make this dish with chicken, it's also great with prawns or crab.


For the marinade:
600g chicken thigh fillets, cut into bite-sized pieces
1 1/2 tbsp cornflour
1 tbsp water
salt and white pepper

For the sauce:
80g butter
3 bird's eye chillies, slices into small pieces
1 handful curry leaves
1/2 cup evaporated milk
2 1/2 tbsp sugar

Place the cornflour, water, salt and pepper into a large bowl and mix until cornflour has dissolved. Add the chicken pieces and marinate for at least 20 minutes.

Heat a few tablespoons of vegetable oil in a medium-sized frying pan until hot. Add the chicken pieces, in batches, and fry for 2 - 3 minutes or until browned. Transfer to a plate lined with paper towels. Set aside.

In the same pan, melt the butter on a low heat, so it doesn't brown. Add the chillies and curry leaves and fry until fragrant.

Stir in the chicken, evaporated milk and sugar and cook for a few minutes or until chicken is heated through and the sauce has thickened.

Spoon chicken onto a plate and serve immediately. Serves 4.